Standing at the Edge of Creation: The World’s Best (and Safest) Lava Viewing Destinations
A molten river meets the sea – a sight that changes you forever.
✈️ Best time to visit: May–October (Hawaii), June–August (Iceland), April–June & September–October (Italy)
💰 Estimated budget range: $2,500–$4,000 per week (mid-range, including flights & guided tours)
⏱️ How long to spend there: 5–7 days per destination
🎯 Difficulty level: Easy to Moderate (all have safe, accessible viewing platforms)
📍 Recommended season: Shoulder seasons for milder weather and fewer crowds
👥 Best for: Solo travelers seeking awe, couples craving romance, families with older kids, and adventure photographers
Introduction
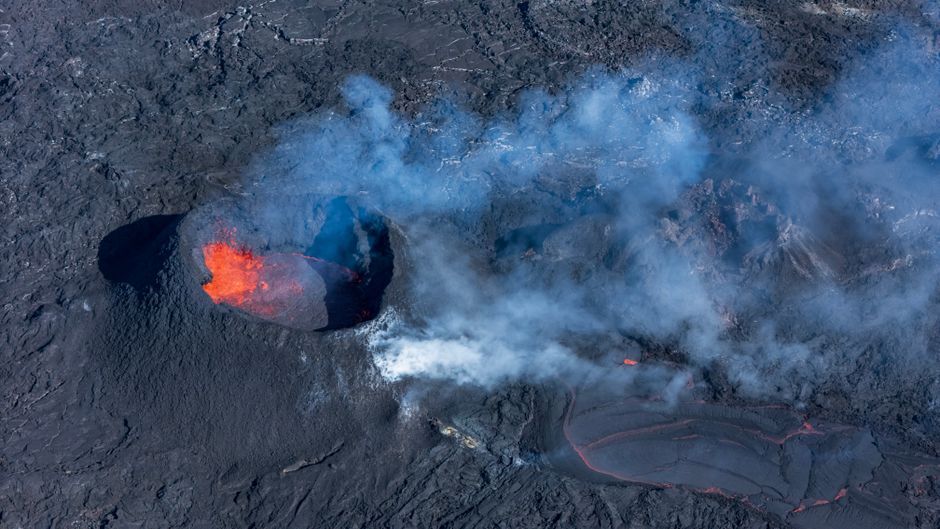
I’ll never forget the first time I saw lava in motion. I was standing on a hardened crust of basalt on the Big Island of Hawaii, about half a mile from a fissure that had opened hours earlier. The air smelled like struck matches and wet earth. A low rumble vibrated through the soles of my boots, and then – there it was – an incandescent ribbon of orange poured down a slope, hissing and sputtering as it crept toward the sea. I felt my chest tighten, not from fear, but from a deep, primal recognition that I was watching the planet make new land. That moment rewired something in me.
Since that trip, I’ve chased molten rock across three continents. I’ve stood on Iceland’s Reykjanes Peninsula as a curtain of fire erupted from a fissure, and I’ve hiked the slopes of Mount Etna in Sicily as night fell and the crater glowed like a furnace door left ajar. I’m no volcanologist – just a curious traveler who’s learned the hard way that lava viewing requires respect, planning, and a willingness to follow safety rules. I’ve made mistakes (more on that later), and I’ve also had experiences that left me speechless.
This article isn’t about reckless thrill-seeking. It’s about the top destinations where you can witness active volcanoes from safe, established perimeters – places where national park services, volcanologists, and local guides have done the dangerous work for you. Whether you’re dreaming of Hawaii’s Kīlauea, Iceland’s Geldingadalir, or Italy’s Stromboli, I’ll give you the practical details, the seasonal realities, and the honest truth about what it’s like to stand at the edge of creation. Let’s get you there – safely, smartly, and with your camera ready.
The Essentials at a Glance
Before we dive deep, here’s what you need to know right now:
- 🌋 Respect the perimeter: Every destination enforces safety zones. Rangers close areas when gas levels rise or lava paths shift. Always heed warnings – no photo is worth a lungful of sulfur dioxide.
- 👟 Wear the right boots: Lava rock is sharp, uneven, and often unstable. I recommend sturdy hiking boots with ankle support. I learned this after slicing my shin on a razor-sharp a’a flow in Hawaii.
- 🌙 Go at dusk: Lava is most dramatic in low light. The contrast between the glowing flow and darkening sky is breathtaking, and the heat feels less oppressive. Most guided night tours run 4–9 PM.
- 💧 Bring twice the water you think you need: Walking on lava fields under a subtropical or high-elevation sun dehydrates you fast. I carry 2 liters for a 3-hour hike, plus electrolytes.
- 📸 Use a tripod: Low-light lava photos need steady hands. A lightweight travel tripod makes the difference between blurry blobs and images you’ll frame.
The Complete Guide
Why This Matters / Why You Should Go
Lava viewing isn’t just a bucket-list checkbox – it’s a confrontation with the planet’s living pulse. In a world of curated experiences and filtered landscapes, watching molten rock flow from the earth’s mantle is one of the last truly raw, uncontrollable spectacles available to travelers. It’s not passive sightseeing; it’s witnessing geology in real-time. For me, it redefined what “power” means. A storm can be fierce, but lava creates new continents. That’s a different scale of awe entirely.
Each of these three destinations offers a distinct experience. In Hawaii, you get accessible, family-friendly viewing at Hawai‘i Volcanoes National Park, where rangers guide you to safe overlooks above Kīlauea’s caldera. Iceland offers a more “wild west” vibe – you can walk right up to a lava field that stopped flowing weeks earlier, feeling the residual heat through your soles. Italy’s Stromboli and Etna combine sea views with volcanic drama, and local volcanologists run nightly boat trips that bring you within a safe shouting distance of glowing explosions. Who should go? Travelers who are curious, patient, and ready to surrender to nature’s schedule. This is not for those who demand Instagram perfection at a specific hour – volcanoes have their own timing.
When to Visit (Seasonal Guide)
Hawaii (Kīlauea & Mauna Loa): The Big Island has year-round warm weather, but the best lava viewing window is May through October. These months offer drier conditions, fewer afternoon rain showers, and clearer night skies for photography. I’ve visited in both July and February. July was perfect – warm evenings, thin crowds after 6 PM, and the lava lake was spectacularly active. February brought persistent vog (volcanic smog) that obscured views and irritated my throat. Avoid November–March if you have respiratory issues; Kona winds can push vog over the viewing areas. Crowds peak in summer, but the park disperses them well across multiple overlooks.
Iceland (Reykjanes Peninsula / Fagradalsfjall): Iceland’s eruptions are sporadic, but when they happen (like Geldingadalir in 2021–2023), viewing is possible May–September when daylight lasts 18–22 hours and trails are snow-free. June and July offer midnight sun, which means you can hike at 2 AM without a headlamp – a surreal experience. Winter (November–March) brings darkness, snow, and dangerous trail conditions; the eruptions typically pause or become inaccessible. I went in early September, and the combination of fading daylight and active lava was magical. The hike is 45–90 minutes each way over uneven terrain, so dry conditions are essential.
Italy (Mount Etna & Stromboli): Sicily and the Aeolian Islands are best from April to June and September to October. July and August are scorching (90°F+ on Etna’s lower slopes) and packed with tourists. I made the mistake of visiting Stromboli in mid-August – the boat trips were sold out days in advance, and the heat from the volcano itself was oppressive. Spring and fall offer comfortable temperatures, fewer crowds, and more reliable evening eruptions (Stromboli is almost continuously active, but summer haze can obscure views). Etna’s summit is cold year-round – bring a jacket even in July.
Budget Breakdown
Here’s what you’ll realistically spend per week, based on my actual trips:
Hawaii (Big Island): Accommodation ranges from $120/night (Airbnb near Pahoa) to $350+ (Volcano House inside the park). I stayed at a cozy vacation rental in Volcano Village for $150/night and was grateful for the kitchen – it saved on dining. Food: $15–30/meal at local cafes; pack lunches for park days. Park entrance fee is $30 per vehicle (valid for 7 days). A guided night lava tour costs $100–200 per person; I recommend the “Lava Ocean Entry” boat tour ($150, includes safety briefing and incredible sunset views). Total weekly budget: $2,200–$3,000 for one person, including a rental car (essential) at $50/day.
Iceland (Reykjavík area): This is the priciest option. Accommodation in Reykjavík starts at $200/night for a hostel private room; I paid $180 for a guesthouse in Hafnarfjörður. Food runs $25–50/meal; grocery stores (Bonus, Krónan) are cheaper. The hike to Geldingadalir is free, but you’ll need a rental car ($80/day) or a tour bus ($150 round trip). I saved money by booking a small-group tour that included transport, snacks, and a guide – $180 for a full day. Total: $2,800–$4,000/week. Money-saving tip: bring a reusable water bottle – Iceland’s tap water is the best in the world.
Italy (Sicily & Aeolian Islands): Etna tours from Catania cost $60–120 for half-day trips (including transport and a guide). Stromboli boat excursions run $50–80 per person. Accommodation in Catania is reasonable ($80–150/night); on Lipari (the main Aeolian island), expect $120–200/night. Food in Sicily is a bargain – $10–15 for a full pasta meal. My total weekly spend was $1,800–$2,500, largely because I used public buses (cheap) and booked tours directly with local guides (bypassing hotel markups). The best value tour: “Etna at Sunset” with guide Salvatore ($70, includes helmet, headlamp, and volcanic snack tasting).
Getting There & Getting Around
Hawaii: Fly into Kona (KOA) or Hilo (ITO) on the Big Island. Hilo is closer to Volcanoes National Park (45 minutes vs. 2 hours from Kona). Rent a car from Hilo Airport – don’t rely on rideshares, which are scarce. The park’s Crater Rim Drive is well-maintained, but some overlooks require short walks on uneven lava. I recommend the Chain of Craters Road for ocean entry views. Navigation tip: download the park’s offline map – cell service is patchy.
Iceland: Fly into Keflavík (KEF), 45 minutes from Reykjavík. For Geldingadalir, drive south on Route 41/43 toward Grindavík. Parking is at a designated lot ($5/day) with a 45-minute hike to the viewing area. If you’re not comfortable driving Icelandic gravel roads, join Reykjavík-based tours (I used “Hike Iceland” – fantastic guides). Public transport doesn’t reach the eruption site. Bring a GPS or downloaded map – the trail crosses barren lava fields with few landmarks.
Italy: Fly into Catania (CTA) for Etna, or into Palermo (PMO) for the Aeolian Islands. From Catania, take an AST bus to Rifugio Sapienza (Etna’s base station) for $5. For Stromboli, take a hydrofoil from Milazzo (2.5 hours, $40) or join a day tour from Taormina. On Stromboli, everything is walkable – the port to viewing points is 20 minutes on foot. Etna requires a 4x4 bus from Rifugio Sapienza to the summit craters ($35 round trip). Don’t attempt to drive yourself – the gravel road is brutal on rental cars.
Top Recommendations / Must-Do Activities
Hawaii: Kīlauea Overlook at Sunset + Lava Ocean Entry Boat Tour
The Kīlauea Overlook provides a safe, wheelchair-accessible platform about 500 feet from the Halemaʻumaʻu crater rim. Go at 6 PM – the lava lake glows orange against the deepening sky, and steam rises from the vent. I sat there for two hours, completely still. Then book a night boat tour from Hilo with “Lava Ocean Tours” (around $150). They bring you within 300 meters of where lava enters the ocean, creating steam explosions and occasional lava bombs (which stay in the water). It’s the most dramatic view possible. Downsides: boats can be bumpy, and you must wear a provided life jacket. Insider tip: book the sunset tour, not the morning one – contrast is everything.
Iceland: Night Hike to the 2021 Geldingadalir Flow Area
Even though the main eruption paused, the solidified lava field retains heat for months. Walk out to the edge of the flow (stay on marked paths) and feel the warmth through your boots. I did this at 11 PM during the midnight sun – the low-angle light turned the black lava to silver. The hike is moderate – 3 km each way over loose scree. Bring hiking poles. The best part: you can see steam rising from cracks, proof the earth is still cooling. The worst part: wind can be brutal; I was nearly knocked over by a gust. Insider tip: go with a guide from “Arctic Adventures” – they provide helmets and gas monitors.
Italy: Stromboli Evening Boat Tour + Summit Hike
Stromboli is nicknamed the “Lighthouse of the Mediterranean” because it erupts every 15–20 minutes. The evening boat tour (book with “Aeolian Experience”) circles the island to watch explosions from the Sciara del Fuoco – a massive black scar where lava slides into the sea. It’s safe, thrilling, and lasts 2 hours ($50 per person). For the truly adventurous, guide-led summit hikes (4 hours, $100) take you to within 200 meters of active vents – you’ll see fire fountains and hear the mountain groan. I did the summit hike, and it was terrifying and sublime. You need a guide by law (for safety). Bring a headlamp with fresh batteries – you’ll descend in darkness.
Traveler’s Pro Tips
Tip 1: Always check the daily volcano activity report. Hawaii’s National Park Service and Iceland’s Met Office update eruption status and gas levels every morning. I check these before breakfast. If sulfur dioxide levels are high (typically above 5 ppm), postpone your visit or choose a different viewpoint. I once ignored a minor advisory and spent two hours with a burning throat – not worth it.
Tip 2: Carry gas masks and safety goggles. Even in safe zones, wind can shift and blow volcanic gas your way. I bought a pair of reusable P100-rated masks ($20 on Amazon) after a guide in Iceland handed me one during a sudden gas plume. Goggles protect from fine ash, which can scratch contact lenses. These weigh nothing and could save your afternoon.
Tip 3: Bring a neck buff for volcanic dust. Lava rocks break down into fine, sharp particles that irritate skin and lungs. A wetted buff worn as a mask reduces dust inhalation dramatically. I used this trick on Etna’s summit, where the air tasted like grit. It’s also great for sun protection.
Tip 4: Learn the difference between pāhoehoe and ʻaʻā. These Hawaiian terms describe two lava types: smooth, rope-like pāhoehoe (easier to walk on) and jagged, sharp ʻaʻā (unforgiving). Knowing which surface you’re on helps you pace yourself and avoid falls. On Iceland’s flows, you’ll mostly walk on pāhoehoe, but Italy’s Etna is classic ʻaʻā – watch every step.
Tip 5: Silence your phone and listen. Lava makes distinct sounds: a low crackle (gas bubbles popping), a hiss (steam meeting rock), and sometimes a deep bass hum. These sounds tell you what the volcano is doing. I’ve heard guides identify a change in eruption style just from the pitch of the hissing. You can’t hear these over a camera shutter or conversation.
Common Mistakes to Avoid
Mistake 1: Wearing trainers or sandals. I once saw a woman in flip-flops trying to walk on ʻaʻā in Hawaii. She was bleeding within five minutes. Lava rock is like walking on broken glass mixed with cinder blocks. Always wear closed-toe hiking boots with thick soles. The consequence: a twisted ankle, a gash, or worse – a ruined trip spent in an ER.
Mistake 2: Trusting weather apps over ranger advice. Volcanoes create their own weather. On Etna, I checked my phone, which said “sunny,” but at the summit, a cloud of volcanic fog dropped visibility to 10 feet. Rangers at the base station know local conditions – listen to them. They’ll tell you if gas levels are safe, if trails are open, or if a sudden weather change is expected. The consequence: getting caught in a gas cloud or losing the trail in whiteout conditions.
Mistake 3: Not bringing enough water. I underestimated how dehydrated I’d get on an Iceland lava field, where the humidity is low and the hike is exposed. I brought one liter for a 4-hour hike and ran out after 3 hours. The consequence: mild heat exhaustion, dizziness, and asking strangers for water (they shared, but I felt foolish). Carry at least 2 liters per 3-hour outing.
Mistake 4: Taking “no flash” photography rules lightly. On Stromboli’s summit, guides strictly forbid camera flash because it can disturb- other climbers’ night vision and scare wildlife. I saw a tourist ignore this and got a stern reprimand from the guide. Worse, the flash ruins your own photos – lava shines better in natural light. The consequence: annoyed fellow travelers and awful pictures.
Your Travel Checklist
Before you go, make sure you’ve got these covered:
- 📄 Documents: Valid passport, printed travel insurance (with volcano activity coverage – regular policies may exclude it), park passes/permits (Hawaii’s park pass is valid for 7 days; Iceland requires no permit; Italy’s Etna requires a summit ticket).
- 🎒 Packing: Hiking boots (broken-in), headlamp with extra batteries, gas mask (P100), safety goggles, neck buff, layers (windproof jacket, fleece), refillable water bottle (2 liters), high-energy snacks, camera with manual mode (tripod optional but recommended).
- 📱 Research: Download offline maps (Google Maps or Maps.me), check the volcano’s official activity feed (USGS for Hawaii, Iceland Met Office, INGV for Italy), and bookmark the local ranger station phone number.
- 🏠 Bookings: Accommodation (especially in Stromboli – it sells out 2+ months ahead), guided tours if needed (I always book night tours in advance), rental car, and travel insurance.
- 🏥 Health/Safety: First-aid kit (with blister pads and antiseptic), any personal medications (especially inhalers – gas can trigger asthma), and a small bottle of water for rinsing eyes if ash gets in.
- 💶 Local Currency: US dollars (Hawaii), Icelandic króna (cash useful for small purchases, though cards are accepted everywhere), euros (Italy). I bring about $100 equivalent in local cash for tips, emergency parking, and small vendors.
- 📲 Apps: “NPS” (National Park Service) for Hawaii updates, “Volcanoes & Earthquakes” (real-time alerts), “Maps.me” (offline navigation), and the official Iceland Met Office app for eruption status.
Traveler FAQ
Q: Is it safe to view lava with children?
A: Yes, but with limits. In Hawaii, the Kīlauea Overlook is safe for kids of all ages (it’s a paved viewing area with railings). Iceland’s hike is too strenuous for young children (45 minutes of uneven terrain). Stromboli’s summit hike is 12+ only, but the boat tour is family-friendly. Always keep kids on designated paths – lava fields have hidden cracks.
Q: Do I need a guide to see lava?
A: For Hawaii’s park overlooks, no – rangers provide maps and safety info. For Iceland’s active flows, a guide is strongly recommended (the trail crosses unstable ground). For Stromboli’s summit, a guide is legally required. I used guides for all three and learned far more than I would alone.
Q: What should I do if the volcano becomes more active while I’m there?
A: Follow ranger instructions immediately. In Hawaii, the park closes sections when lava levels rise. In Iceland, the Met Office issues color-coded alerts (red = danger, no access). I was in Iceland during a brief alert – we evacuated the trail within 20 minutes. Always carry the local emergency number (112 in Iceland and Italy, 911 in Hawaii) and keep a charged phone.
Q: Can I see lava from a helicopter or plane?
A: Yes, and it’s spectacular. Hawaii offers helicopter tours ($250–400 per person) that fly over Kīlauea’s caldera and lava ocean entry. In Iceland, flightseeing tours from Reykjavík cost $400+ and require good weather. Italy doesn’t permit low flights over Etna. I did a helicopter tour in Hawaii – it was worth every penny for the aerial perspective, but you miss the ground-level experience of feeling the heat.
Q: What’s the best camera gear for lava photography?
A: A camera that allows manual exposure (DSLR or mirrorless) with a fast lens (f/2.8 or wider) and a sturdy tripod. I use a Sony A7III with a 24-70mm f/2.8 lens. For close-ups, a 70-200mm is great for capturing lava textures. Smartphones work too – use night mode and steady your hand against a rock. The key is to focus on the brightest spot and underexpose slightly to avoid blowing out the orange glow.
Ready for Your Adventure?
Standing before an active volcano is not a passive experience. It demands your full attention, your respect, and a willingness to accept that you are small in the face of elemental force. But that humility is precisely what makes it transformative. I’ve traveled to dozens of countries, climbed mountains, and swum in oceans, but nothing has left me feeling more connected to the living Earth than watching lava flow. It’s raw, it’s unpredictable, and it’s absolutely worth the flight, the hike, and the careful planning.
You don’t need to be a geologist or an extreme adventurer. You just need curiosity, a decent pair of boots, and the prudence to stay within the safety perimeters that professionals have established for you. Choose Hawaii for ease and accessibility. Pick Iceland for a near-wilderness experience. Opt for Italy if you want Mediterranean charm with your fire fountain. Each destination offers a different window into the same primal wonder.
So, go ahead. Book that flight. Download that volcano app. Pack that gas mask. The lava is flowing, and it’s waiting for you – safely, spectacularly, and powerfully. I’ll see you at the overlook.


No comments:
Post a Comment